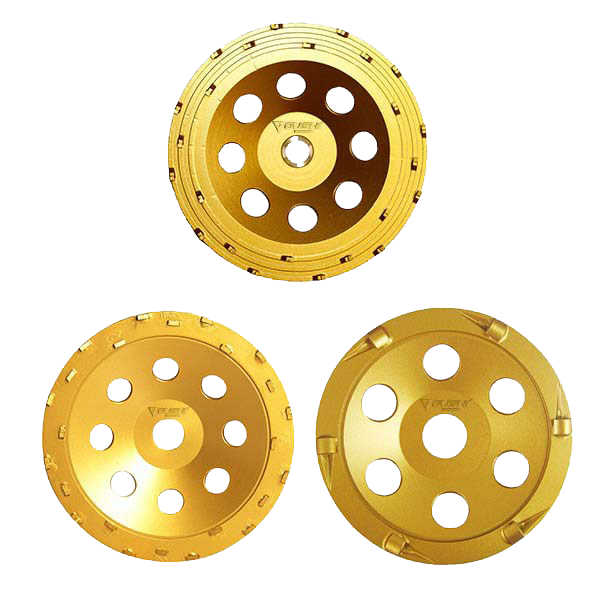
Why PCD Beats Diamond on Coatings
The most common complaint in floor preparation is that a diamond cup wheel “just smears” the coating — or spins it into a sticky ball, or leaves a shiny glaze on top of the adhesive. None of that is a quality problem with the wheel. It is a tool-selection problem.
- A diamond cup wheel grinds the concrete. It is designed to cut hard, brittle material by scratching it away a grain at a time. Soft, flexible, sticky coatings are the opposite of what it is built for, so the grits skid across the surface rather than cutting in.
- A PCD cup wheel removes what is on the concrete. The tips are blunt, blocky polycrystalline diamond on a carbide substrate. They bite into the coating from the side and shear it — like a scraper, not like sandpaper. There is nothing for the coating to load onto.
- Heat is the real enemy. When a diamond wheel loads up, grinding stops and friction starts. That friction softens the coating further and burns the concrete under it — the dark gloss marks you see on a failed strip. PCD avoids the load, so it avoids the burn.
- PCD keeps its shape. Because polycrystalline diamond is far more impact- and wear-resistant than the small grits in a metal bond, a PCD tip holds its geometry far longer on abrasive coating work — which is why it stays aggressive instead of rounding off after the first few square metres.
Full Specifications
| Model | PCD Cup Wheel Series |
|---|---|
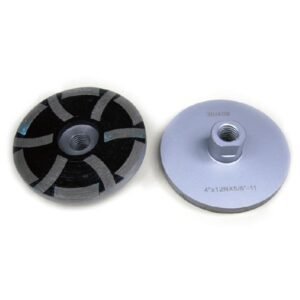
| Wheel type | Single-row cup wheel, PCD tips with interleaved arrow segments |
| PCD type | Quarter-round PCD tip, approx. 13 × 8 mm (blunt polycrystalline diamond) |
| Tip count | 6 / 8 / 12 pieces (150–180 mm also available in 12) |
| Depth-limiting segments | Arrow / blade segments interleaved between PCD tips |
| Diameter | 100 mm (4″), 115 mm (4½”), 125 mm (5″), 150 mm (6″), 180 mm (7″) |
| Arbor / bore | 20 mm, 22.23 mm (7/8″), 5/8″-11 thread, M14 thread — others on request |
| Body | Pressed steel cup body; lightweight circular core design on some sizes |
| PCD material | Polycrystalline diamond layer on tungsten carbide substrate, brazed to body |
| Coatings handled | Epoxy, polyurethane, adhesive, mastic, bitumen, paint, varnish, plaster, mortar, thin-set, VCT & carpet glue, waterproof membrane |
| Coating thickness | Best on up to ~3 mm per pass; heavy build-up removed in multiple overlapping passes |
| Substrate | Concrete, screed, self-levelling compound, asphalt |
| Do not use on | Metal, nails, screws, rebar, steel mesh — brittle tips will chip |
| Recommended speed | 8,000–11,000 rpm for 100–125 mm on hand-held grinders; reduce for 150–180 mm |
| Max peripheral speed | 80 m/s (approx. 13,300 rpm on a 115 mm wheel) — confirm per size |
| Machine | Hand-held angle grinder, edge grinder, walk-behind floor grinder |
| Operation | Dry or wet |
| Dust control | Dust shroud + HEPA vacuum recommended for dry use |
| Net weight | Approx. 0.45–1.2 kg depending on diameter |
| Balance | Balanced core body to minimise wobble at speed |
| Finish left behind | Controlled scratch pattern — refine with a diamond cup wheel before coating |
| Packaging | 1 pc / box; 20–40 pcs / carton |
| MOQ | 50 pcs (standard sizes) |
| Lead time | 5–10 days stock; 15–30 days custom |
| OEM | Logo, body colour, packaging, custom diameter and tip layout |
| Maintenance | No dressing required; clean resin off tips if they glaze on very hot coating |
| HS code | 8207.90 / 8207.19 — confirm with your customs broker |
| Certification | ISO 9001 factory; CE / EN 13236 documentation on request |
| Price range | US$8–45 per piece depending on diameter and tip count |
PCD vs Diamond vs Sanding — Pick the Right Removal Tool
Three tools, three different jobs. Mixing them up is where floor prep goes wrong.
| Factor | PCD Cup Wheel | Diamond Cup Wheel | Sanding Disc / Paper |
|---|---|---|---|
| Works on | Coatings and adhesives | The concrete itself | Thin paint, light residue |
| Action | Shears / lifts coating | Grinds and levels slab | Abrasive scratch |
| Sticky coatings | No loading, no smearing | Loads up and glazes | Clogs in seconds |
| Thick build-up | Best choice | Poor — burns the coating | Not practical |
| Levels concrete | No — not its job | Yes, this is its job | No |
| Surface finish left | Scratch / shallow gouges | Even, controlled CSP profile | Fine, decorative |
| Life on coating work | Very long | Short — grits polish away | Minutes |
| Best sequence | PCD strip → diamond cup refine → sand / polish only if a fine finish is wanted | ||
| Cost per m² of coating removed | Lowest | High (tool dies fast) | Highest |
Related grinding tools: Concrete Floor Polishing Pads, Diamond Sanding Sheets, Triangle Sanding Discs.
Choose by Coating Type
Different coatings fail in different ways. This is the table to check before you buy.
| Coating on the slab | Tool to reach for | Why |
|---|---|---|
| Epoxy / epoxy paint | PCD, then diamond | Hard but not brittle — PCD shears it, diamond tends to polish it and burn the slab |
| Carpet / VCT adhesive | PCD | Rubbery and sticky — the classic load-up job for diamond, PCD lifts it clean |
| Tile thin-set / mortar | PCD for the bulk, diamond to finish | Hard and thick — PCD breaks it up fast, diamond brings the slab back flat |
| Mastic / bitumen / tar | PCD | Soft and smearing — diamond will just push it around |
| Polyurethane / elastomeric | PCD | Flexible coatings ride over diamond grits; PCD cuts from the side |
| Waterproof membrane | PCD | Fabric-reinforced membranes foul diamond instantly |
| Paint / varnish (thin) | Diamond cup | Thin enough that a diamond cup removes it while profiling the slab in one pass |
| Plaster / skim coat | PCD | Soft — PCD lifts it without loading |
| Self-levelling residue | Diamond cup, PCD spot | Hard and brittle — diamond levels it; PCD for thick lumps and high spots |
| Laitance / weak surface layer | Diamond cup — never PCD | Laitance is part of the concrete; PCD scratches rather than removing it properly |
The Two-Stage Workflow Most People Skip
PCD alone rarely gives a coatable floor. It removes the coating; it does not prepare the slab. That is what the second pass is for:
- Stage 1 — Strip with PCD. Keep the wheel flat, work in overlapping passes, and let the tips shear. Do not bear down. Move in a steady pattern rather than chasing one stubborn patch, so you do not dig a hollow in one place.
- Stage 2 — Refine with a diamond cup wheel. Go back over the floor with a 30 or 60 grit diamond cup. This removes the PCD scratch pattern, evens out the surface and opens the concrete to the right profile for bonding.
- Stage 3 — Only if you need it: polish or fine-sand. For a polished concrete or a very thin coating, continue up the grits. For most epoxy, resin or levelling jobs, stage 2 is where you stop.
Skip stage 2 and the PCD scratches telegraph through the finish, or the coating bonds poorly to a surface that was never properly opened. This is the single most common reason a strip-and-recoat job fails within a year.
Arrow Segments and Depth Control
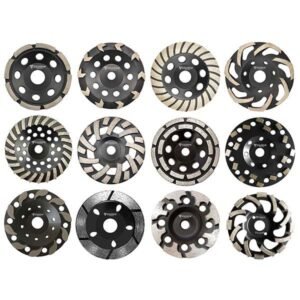
Look at a PCD cup wheel and you will see two kinds of segment: the blunt PCD tips and the arrow or blade segments between them. The arrow segments are not there to grind — they are depth limiters.
- They ride the surface and stop the tips digging in. Instead of ploughing gouges into the slab, the wheel strips the coating and leaves a shallow, even scratch.
- They stabilise the wheel. When you cross a soft patch of adhesive, an unladen PCD tip can grab and kick. The arrow segments keep the wheel seated and the cut controlled.
- They protect the substrate. On a thin coating over a slab you intend to coat straight afterwards, that protection is what keeps the floor flat enough to use.
Tip count: 6, 8 or 12?
Tip count is a balance-and-machine decision, not an aggression dial. Fewer, larger tips bite deeper and clear coating faster per pass — the usual pick for 100–125 mm wheels on hand-held grinders. More tips spread the load, run smoother and leave a flatter floor — the usual pick for 150–180 mm wheels and walk-behind grinders. Very thick, very hard coatings favour fewer tips on a powerful machine; large areas on a big grinder favour more.
Operating Guide
- 1. Test first. Grind a small, hidden patch and inspect the scratch depth. PCD scratches — know how deep before you commit.
- 2. Clear the floor. Sweep, scrape and remove loose material. Nails and screws will destroy a PCD tip in seconds — pull them.
- 3. Fit the guard and dust control. Guard on, shroud and HEPA vacuum connected, eye and hearing protection worn. Coatings and old paints can contain silica and worse.
- 4. Check the arbor and balance. Match the arbor to your machine (22.23 mm, 20 mm, 5/8″-11, M14). Spin it up off the floor and listen for wobble before you touch down.
- 5. Keep the wheel flat. Tilting digs a gouge in one edge and does not remove coating any faster. Flat and steady beats heavy.
- 6. Work in overlapping passes. Move consistently across the floor rather than dwelling on one spot. Consistency is what gives you an even result.
- 7. Watch the coating, not the clock. The moment removal slows, check whether the tips have glazed with resin. Clean them rather than pressing harder.
- 8. Refine with a diamond cup. Stage 2 always, unless you genuinely only needed the coating gone and nothing is going on top.
Applications
- Warehouse and factory floor renovation — stripping old epoxy and floor paint before re-coating.
- Retail and office refits — removing carpet adhesive, VCT adhesive and old mastic.
- Concrete surface preparation before epoxy, resin, PU or self-levelling systems.
- Removing waterproof membrane and tile adhesive in wet areas.
- Stripping bitumen, tar and glue residue ready for polishing.
- Edge, corner and spot work that a large ride-on grinder cannot reach.
- Paint, plaster and skim-coat removal ahead of a new finish.
- Rough scan for hidden fixings before a full diamond grind pass.
Related products: Concrete Floor Polishing Pads, G-Ultra Lifter, 2-in-1 Tile Vibration Machine.
OEM & Wholesale
GUSHI supplies PCD cup grinding wheels to flooring contractors, surface preparation specialists, tool distributors and rental fleets worldwide. We build custom diameters, tip counts (6 / 8 / 12 and up), segment layouts, arbor threads (20 mm, 22.23 mm, 5/8″-11, M14, M16), body colours and retail packaging, and we support OEM/ODM and private label. Samples are available for testing; the sample fee is returned against your first official order.
Frequently Asked Questions
What is the difference between a PCD cup wheel and a diamond cup wheel?
They do different jobs. A diamond cup wheel grinds the concrete — it levels, removes laitance and opens the surface. A PCD cup wheel removes what is on top of the concrete. PCD tips are blunt, so they shear and lift a coating instead of grinding it into dust, which is why they do not load up or smear. Most renovation floors need both: PCD first to strip, diamond second to even out the slab.
Which coatings can a PCD cup wheel remove?
Epoxy and polyurethane, carpet and VCT adhesive, tile thin-set adhesive, mastic, bitumen and tar, paint and varnish, plaster and skim coat, self-levelling residue, mortar, waterproof membrane and general glue build-up. It wins biggest on soft, sticky and flexible coatings — exactly the ones a diamond wheel cannot handle.
Why does my diamond wheel smear the coating instead of removing it?
Because diamond is built to cut hard and brittle material, and a soft coating is neither. The grits skid across the surface, the dust mixes with the softened coating and balls into a gum that glazes the segments. Grinding then stops and friction starts — which is where the burn marks come from. PCD cuts the coating from the side, so there is nothing to load onto.
Do I still need to diamond grind after using PCD?
Usually yes, and it is the step people skip. PCD tips are blunt by design, so they leave a scratch pattern or shallow gouges. Under a thin coating, a levelling compound or a polish, that pattern telegraphs through. Run a 30 or 60 grit diamond cup over the floor to smooth the marks and open the surface for bonding.
How many PCD tips — 6, 8 or 12?
It is a balance and machine decision. Fewer, larger tips bite deeper and clear coating faster per pass — usual for 100–125 mm wheels on hand-held grinders. More tips spread the load, run smoother and leave a flatter floor — usual for 150–180 mm wheels and floor grinders.
What do the arrow segments do?
They are depth limiters. Arrow segments ride the surface and stop the PCD tips digging in, so you strip the coating without ploughing gouges into the slab. They also stabilise the wheel and stop it grabbing over soft adhesive — which is what keeps the substrate flat enough to coat straight afterwards.
Wet or dry — and can I run it on a normal angle grinder?
Both work. Dry is normal for coating removal, with a dust shroud and HEPA vacuum strongly recommended because old coatings and floor paints can contain silica and other hazardous fillers. Wet keeps dust down and suits floor grinders with water feed, but slurry has to be managed. A standard 100 or 125 mm angle grinder is the normal home for a PCD cup wheel; 150–180 mm wants a bigger machine or a floor grinder, guard in place.
What should I not do with a PCD cup wheel?
Do not run it over metal, nails, screws, rebar or mesh — the tips are brittle and a nail will chip or shear them off. Do not use PCD to level concrete or remove laitance; that is a diamond cup wheel job. Do not bear down for faster removal — keep the wheel flat and work in overlapping passes. Always test in an inconspicuous corner first, because PCD scratches and depth depends on the slab. And keep the guard on.
MOQ, lead time, OEM and samples?
MOQ 50 pcs for standard diameters. Custom diameters, tip counts, segment layouts, arbors and packaging are made to order. Standard sizes ship in 5–10 days, custom in 15–30 days after deposit. OEM/ODM and private label welcome; samples available with the fee returned on your first official order.