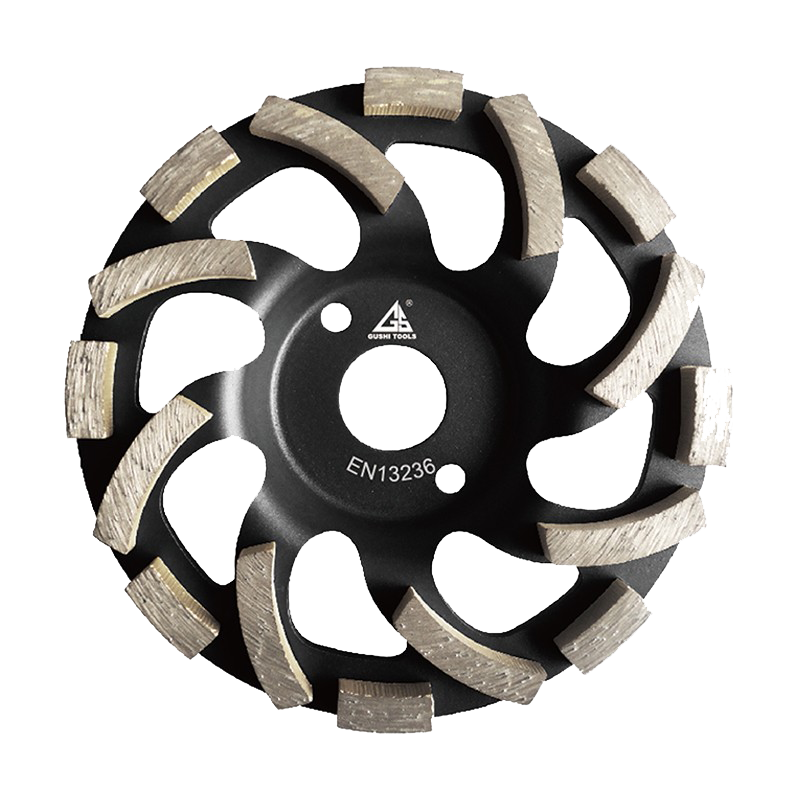

Product Overview
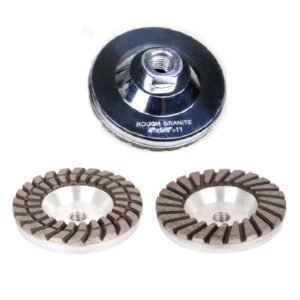
The L shape grinding cup wheel is the general-purpose wheel in the GUSHI diamond cup range: the one you reach for when you do not know what the day will bring. It levels a concrete slab on Monday, flattens a granite worktop on Tuesday and eases a porcelain tile edge on Wednesday without changing tools. That flexibility is the whole point of the shape, because the L geometry is forgiving in a way that a purpose-built floor wheel is not — it bites on hard material without glazing, and it stays controllable on soft material without digging in.
Two things make it work across that range. The first is the point-leading L segment, which converts a modest angle grinder into a tool that can actually take material off granite. The second is the open, swept layout, which keeps the cut cool and clear so the wheel is never fighting its own swarf. The steel body carries heat away from the segments and doubles as a pump, throwing air and water outward through the gullets.
It is a metal-bond diamond wheel, so it is equally at home dry — with a rated extractor on the grinder — or wet with a water feed, which is the way to run it on calcitic stone and porcelain. Change the grit and bond and the same body covers bulk levelling through to finishing preparation.
Who this wheel is for: stone fabricators flattening slabs and dressing edges, tile fixers easing cut edges and grinding lippage, general contractors levelling small concrete areas, restoration and maintenance crews dressing steps and thresholds, and distributors who want one SKU family that covers concrete, natural stone and tile under their own brand.
How an L Segment Cuts
The difference between this wheel and a conventional segmented cup wheel is not cosmetic. It changes the way load enters the material, and you can feel it in the first thirty seconds of use.
The point leads, and that is the whole trick
A flat segment lands face-down. From the instant it touches, the entire block is in contact, the machine’s weight is divided across that whole area, and the specific pressure at any one diamond is low. On abrasive concrete that is survivable, because the concrete is soft enough to fail under a modest load. On granite, quartz or porcelain it is not: the diamonds skate, friction does the work instead of fracture, and the segment glazes over. The L segment avoids this by leading with its point. Contact starts on a narrow arris, the same load is concentrated into a much smaller area, and unit pressure goes up immediately — which is what actually starts a cut in a hard mineral. The broad part of the segment only arrives once the cut is already established, where its job is to flatten the groove and carry the load rather than to initiate anything.
Why the open gullet area matters more than segment count
Between neighbouring L segments the body is cut away into a wide teardrop gullet. Measured round the rim, roughly 45 to 55 percent of the circumference on these wheels is open. That number is the reason the wheel runs cool, and it is worth understanding what it buys. Every particle of swarf produced at the contact point has to travel somewhere. On a closed or tightly segmented rim, it travels around the rim with the wheel, gets re-ground under the next segment, and turns into fine powder and heat. On an open rim it is thrown tangentially into the gullet and out, before the next segment arrives. The same path serves the coolant: water or air reaches the segment root rather than being pushed away from the contact zone by a wall of rotating steel.
The swept layout and swirl marks
A radially laid segment scrapes along exactly the same arc on every revolution. That repetition is what produces the characteristic swirl pattern that shows up under raking light after a coating or a polish is applied, and it is the reason flooring crews sometimes spend an extra pass or two chasing marks instead of finishing. Sweeping the segment back from the radius breaks the repetition. Each tooth meets the surface at an angle and travels a slightly different path from the one before it, so passes cross rather than stack. In practice you get a shallower, less directional pattern out of the same number of passes. It reduces swirl marks; it does not remove them, and no wheel will. Cross-hatching the passes at roughly 90 degrees and finishing with a finer grit is still the technique that decides what the floor looks like.
Where the heat goes
In a metal-bond diamond wheel the steel body is the heat sink. Heat generated at the contact point travels down through the segment, into the body, and out through the large surface area of the disc and the gullet edges. Metal-bond segments tolerate more heat than resin-bond wheels — which soften and pyrolyse from about 200 °C — but they are not immune. Above roughly 150 °C at the bond the metal matrix starts to soften, and a softened matrix lets go of its diamonds prematurely: the wheel loses segments faster than it wears them, and the surface under it stops improving. The practical defence is the same on every material: keep the wheel moving, do not dead-stop in one spot, and let the open gullets and the water do their work.
Segment Layout: Which Geometry for Which Job
Cup wheels are sold by segment shape, and the shape is a performance decision, not a styling one. These five layouts cover almost everything sold into concrete, stone and masonry, and they are not ranked — they answer different questions.
| Dimension | Single row | Double row | Turbo / arrow | L shape (this product) | Continuous rim |
|---|---|---|---|---|---|
| Contact area | Smallest | Larger — more segments sharing the load | Medium, angled slots | Small at the point, widening behind it | Largest — full circumference |
| Gullet volume | Medium | Medium, split between rows | Medium, spiral slots | Large — 45–55% of the rim is open | None |
| Stock removal rate | Highest on flat concrete | High, just below single row | High | High, and it holds up on hard stone | Lowest |
| Behaviour on hard stone | Rubs and glazes | Rubs and glazes | Better — angled edge keeps a bite | Best — point initiates the cut | Slow but stable |
| Wheel life | Shortest — few segments, heavy load each | Long | Long | Long, but the point wears first | Longest on non-abrasive material |
| Tracking / wave risk | Highest on a single-disc machine | Lower | Moderate | Low — interrupted, swept contact | Lowest |
| Scratch pattern | Coarse, directional | Finer, flatter | Relatively fine for its speed | Shallower, less directional than radial | Smoothest and most uniform |
| Edge and corner access | Moderate | Poor — wide contact | Moderate | Best — narrow point gets close to walls and into corners | Moderate |
| Best on | Concrete, screed, heavy levelling | Concrete, general grinding and smoothing | Hard concrete and dense stone | Mixed work: concrete, granite, marble, quartz, masonry, tile edges | Natural stone, tile, brittle material, finishing |
| Cost per m² ground | Lowest on concrete only | Low on concrete | Low on concrete | Best value on mixed and stone work | Highest, but it is the finishing choice |
Quick selection. Levelling a large concrete floor as fast as possible → single row or a T segment floor wheel. General concrete grinding with less vibration → double row. Hard concrete that glazes → turbo. Whatever the day brings, including stone and tile edges → L shape. Finishing an edge on a stone or tile that must not chip → continuous rim.
L shape and T shape — related, but they answer different questions
| Dimension | L shape (this product) | T shape |
|---|---|---|
| What the profile does | Point leads and concentrates pressure to start the cut | Wide face on a narrow root; the flare keeps a sharp leading edge as it wears |
| Primary strength | Biting on hard stone and reaching edges and corners | Sustained removal rate and long life on abrasive concrete |
| Sensible material | Granite, marble, quartz, tile edges, mixed work | Concrete, screed, terrazzo, masonry |
| Where it is weaker | Concrete production runs — a T segment is faster per m² | Hard stone — the flat face rubs before it bites |
If your work is mostly floors, see T Segment Grinding Cup Wheels. If your work is a mix of floors, slabs and tiles, the L shape is the better single purchase.
Full Specifications
| Product name | L Shape Grinding Cup Wheels (L segment diamond cup wheel) |
|---|---|
| GUSHI series code | LSHP-CUP |
| Outside diameter | 100 mm (4″) · 115 mm (4.5″) · 125 mm (5″) · 150 mm (6″) · 180 mm (7″) · other sizes on request |
| Arbor / bore | 22.23 mm (7/8″) plain bore · M14 thread · 5/8″-11 thread · M16 · M19 on request |
| Segment profile | L shape, point leading (inverted L segment) |
| Segment count | 8 / 9 / 10 / 12 per wheel depending on diameter · custom counts to order |
| Segment height | 5 mm standard · 6 mm heavy-duty · 8 mm on request |
| Segment width (radial) | 10–20 mm depending on diameter |
| Diamond grit | #6 · #16/20 · #30/40 · #50/60 · #100/120 · #200 · #300 · other grades on request |
| Bond type | Metal bond — sintered or brazed diamond segment |
| Bond hardness | Soft · medium-soft · medium · medium-hard · hard (grade selected to your material) |
| Diamond concentration | Standard · high concentration available for long-life specifications |
| Body material | Pressed steel body · aluminium body option (lighter, quieter, less load on the grinder) |
| Open gullet area | ≈45–55% of the rim circumference, in teardrop gullets between swept segments |
| Body finish | Powder coated — black standard, other colours for OEM |
| Segment attachment | High-frequency silver brazing (standard) · laser welding (heavy-duty) · hot-press sintering |
| Maximum rim speed | 80 m/s, in accordance with EN 13236 |
| Maximum rpm by diameter | Ø100 = 15,300 rpm · Ø115 = 13,300 · Ø125 = 12,200 · Ø150 = 10,200 · Ø180 = 8,500 |
| Net weight (guide) | ≈0.35 kg (Ø100, aluminium body) to ≈0.95 kg (Ø180, steel body) |
| Grinding condition | Dry with dust extraction, or wet with a water feed |
| Suitable machines | Angle grinders · variable-speed grinders · hand-held and walk-behind floor grinders (with the correct arbor) |
| Balance | Dynamically balanced for vibration-free running |
| Working environment | Concrete slabs, screed, mortar, terrazzo, granite, marble, limestone, engineered quartz, quartzite, brick, block, roof tile, ceramic and porcelain tile |
| Packaging | Neutral white box · blister card · paper insert · full colour branded carton |
| Certification | ISO 9001 quality system · CE · EN 13236 · RoHS on request · SGS inspection available |
| MOQ | 100 pcs standard · 500 pcs custom and OEM |
| Lead time | 5–10 days standard · 15–30 days custom, after deposit |
| Port of loading | Shanghai or Ningbo, China |
Reading the speed marking. The maximum rpm printed on the wheel is not a performance recommendation, it is a safety limit derived from that diameter. Fit the wheel to a grinder whose no-load speed is at or below that number — see Rim Speed and Reading the Cut for what happens when a large diameter wheel goes on a fast grinder.
Matching the Wheel to the Material
This is the section that decides whether the wheel works for you, because the same L shape body is built in three different bond and grit combinations and they are not interchangeable. The underlying rule looks backwards until you have seen it fail once: hard material wants a soft bond, soft material wants a hard bond. A hard, dense material does not wear the bond down, so the diamonds round off and polish the surface instead of cutting — you need a soft bond that lets go of dull diamonds quickly. A soft, abrasive material erodes the bond on its own, so you need a hard bond simply to stop the segment disappearing.
Marble, limestone, travertine and other calcitic stone
Soft, porous and heat-sensitive. The failure mode on these materials is not wear, it is scorching: calcite starts to discolour from a surface temperature of roughly 150 °C upward, and the yellow-brown mark left behind has to be ground away, which is slow and expensive on a finished slab. Bond should be soft to medium and the working grit #60/80 finishing at #100/120, with water running and the wheel kept moving in long overlapping passes. Never dead-stop on marble. Wet only, without exception, on pale calcitic stone.
Granite, engineered quartz and quartzite
Hard, dense and non-abrasive, which is the mirror image of the marble case: the bond barely wears, so the diamonds dull and the surface goes glassy. Choose a soft bond with as much diamond as the spec allows — higher concentration spreads the load across more grains so each one runs cooler — start at #30/40 to flatten, then step to #60/80. Engineered quartz is a special case because it contains resin; friction heat softens that resin and leaves a grey haze that no amount of polishing restores, so keep the water running and the pressure moderate.
Concrete, screed, mortar and masonry
Medium-hard and abrasive, and the only family where the bond wears out before the diamonds do. This is home territory for this wheel: #16/20 or #30/40 for levelling high spots and trowel marks, #60/80 for general grinding, #100/120 to prepare for a coating. A medium to hard bond survives abrasive aggregate far longer than a soft bond would. Dry grinding is workable with a rated extractor; wet is faster and cleaner on indoor work. Brick, block and roof tile are softer and more abrasive still, and want the hardest bond in the range.
| Material | Hardness / behaviour | Bond | Working grit | Main risk |
|---|---|---|---|---|
| Marble, limestone, travertine | Soft, calcitic, porous | Soft – medium | #60/80 → #100/120 | Scorching and discolouration — wet only, light pressure |
| Engineered quartz, quartzite | Very hard, contains resin | Soft | #30/40 → #60/80 | Resin burn haze — keep water running |
| Granite | Hard, dense, non-abrasive | Soft, high concentration | #30/40 → #60/80 | Glazing — the bond will not self-dress if too hard |
| Concrete and screed | Medium-hard, abrasive | Medium – hard | #16/20 · #30/40 → #60/80 | Matrix erosion — segment wears out before the diamond |
| Brick, block, roof tile | Soft, very abrasive | Hard | #16/20 | Rapid segment loss if the bond is too soft |
| Terrazzo | Hard chips in a soft matrix | Medium | #30/40 → #100/120 | Chip pull-out under heavy pressure |
| Ceramic and porcelain tile | Very hard, brittle | Soft, fine grit | #100/120 → #200 | Edge chipping — light pressure, water, do not tilt |
The honest trade-off. No single bond and grit is optimal on all of these. This L shape wheel is the generalist — it will handle a mixed workload on all of them competently, which is why it is the wheel most fabricators and fixers keep fitted. If you grind production volumes of one material, buy a second wheel matched to it. That is not a limitation of this product, it is how bonded abrasives work.
Water, Slurry and Stone Discolouration
On concrete, the argument for wet grinding is dust control. On stone, there is a second and more expensive argument: heat and contaminated slurry can leave marks that do not come out. Stone fabricators lose more money to discoloured slabs than to worn wheels, and both causes are avoidable.
Scorching
Calcite — the mineral that makes up marble, limestone and travertine — begins to discolour at a surface temperature of roughly 150 °C. The mark is a yellow, brown or grey bloom that follows the path of the wheel, and it is not a surface stain. Polishing will not remove it; the only cure is to grind past it. Because the L point concentrates pressure, this wheel cuts faster than a flat block and therefore generates less heat for the same amount of material removed — but that advantage disappears instantly if you lean on it in one place. Keep the wheel moving, use long overlapping passes, and let the wheel’s rate do the work rather than your body weight.
Rust bloom and cross-contamination
Slurry from a diamond wheel carries fine steel particles from the body and the swarf, and on pale stone those particles oxidise into rust-coloured spots if the slurry is left to dry on the surface. Two rules prevent it. First, rinse the work immediately after each pass rather than at the end of the job. Second, do not recycle dirty water on light-coloured stone: use clean water and change it often. On a multi-material job, keep the water for stone separate from the water used on concrete, because concrete slurry is alkaline and abrasive and will scratch a polished face on the next pass. A fresh-water feed and a wet vacuum that keeps up with the slurry is the setup that produces clean stone.
How much water the open gullets actually need
Because 45 to 55 percent of the rim is open, this wheel clears itself far better than a continuous rim, and it needs less water to do it. On a handheld grinder a trickle of roughly 0.3 to 0.5 litres per minute delivered into the contact area is normally enough to keep the cut cool and the swarf mobile. On a walk-behind floor grinder, 1 to 2 litres per minute is the usual working range. Aim the water at the contact point, not at the guard: water poured onto the top of a rotating wheel is thrown off before it ever reaches the cut. If the surface comes up dry behind the wheel and the swarf is turning to powder instead of slurry, you are under-watering, whatever the gauge says.
Edge, Corner and Reveal Work
This is where the L shape earns its keep over a multi-row or continuous wheel. Because the segment is narrow at the point and the wheel is balanced, you can work much closer to a wall, into a corner or along a tile arris than a wide-contact wheel allows — and you can do it without the wheel walking away from you. The technique, though, matters as much as the geometry.
The reveal: half on the wall, half on the floor
When you grind a floor up to a plastered wall, the last 100 to 150 mm is where most floors end up wrong. The common mistake is to grind the last strip flat like the rest of the floor, which leaves a shallow trench along the wall; when the coating or the screed goes down, that trench reads as a visible dip, a “picture frame” around the room. The professional technique is to let the last pass run half on the wall and half on the floor. The wheel floats on the plaster for part of its path, so it cannot cut a trench, and the wall itself limits how deep the last strip goes. Change the blade guard position and wear a dust mask, because the wall takes the same load the floor would have.
Corners, pipe collars and drains
In a corner, work the wheel in from both directions and finish the very last 15 to 20 mm with a smaller Ø100 wheel or by hand with a dressing stone — a 125 mm wheel simply cannot reach into an internal corner without the body fouling the wall. Pipe collars, floor drains and soil pipes are handled the same way: circle the pipe with the wheel held flat rather than tilting it to reach around, and accept that a small ring at the base of the pipe will need hand work. Tilting the wheel to reach an obstruction is the most common cause of a gouge in a finished floor.
Easing and chamfering tile and stone edges
The L shape is a natural tool for dressing the cut edge of a tile or a slab. Hold the wheel at the angle you want on the arris — typically 45 degrees for a chamfer, or a shallower 20 to 30 degrees to simply ease a sharp edge — and use light, sweeping passes with water running. Coarse grit leaves a scratch that needs a finer pass to remove, so ease with #100/120 and finish at #200 on porcelain, where a chipped arris is the failure everyone notices. Do not attempt to cut a long 45-degree mitre with a cup wheel: the geometry is wrong for it and the result will be uneven. A cup wheel eases and shapes an edge that has already been cut; the cut itself belongs to a blade or a wet saw. For a repeatable tile edge, pair this wheel with a 45 Degree Angle Chamfer tool, and finish natural stone arrises with a GUSHI Diamond Hand Polishing Pad.
Steps, thresholds and doorways
Thresholds and step nosings are high-traffic edges where a chamfer reads as wear, so grind them flat and then ease only the very arris. Grind the high side of a step, never the low side, and check the two surfaces against a straightedge before you coat. On a doorway, protect the adjacent room with a taped sheet before you start: slurry and stone dust travel further than you expect, and a stained carpet is not a recoverable mistake.
Rim Speed and Reading the Cut
Cup wheels are limited by the speed of the rim, not by the speed on the grinder’s nameplate, and the two are related by diameter. This is the trap that catches people who own a large wheel and a fast grinder: an angle grinder turns at a roughly fixed no-load speed, so fitting a larger wheel raises the rim speed, and rim speed is what the safety limit is about.
| Wheel diameter | Max rpm to stay within 80 m/s | Rim speed at 11,000 rpm | Verdict |
|---|---|---|---|
| 100 mm (4″) | 15,300 rpm | 57.6 m/s | Safe on any standard grinder |
| 115 mm (4.5″) | 13,300 rpm | 66.2 m/s | Safe up to 13,300 rpm |
| 125 mm (5″) | 12,200 rpm | 72.0 m/s | Safe up to 12,200 rpm — check the plate |
| 150 mm (6″) | 10,200 rpm | 86.4 m/s | Over the limit at 11,000 rpm — do not fit |
| 180 mm (7″) | 8,500 rpm | 103.7 m/s | Over the limit — needs a slow-speed or variable machine |
Two practical consequences follow. First, always read the maximum rpm marked on the wheel and compare it with the no-load speed on the grinder’s rating plate — not with the speed you happen to have selected. Second, a variable-speed grinder is worth having for stone: running a 125 mm wheel at 8,000 to 9,500 rpm instead of flat out gives you a rim speed in the 52 to 62 m/s band, which is plenty to cut and much easier to control on a delicate edge.
Reading the cut by sound and swarf
- Correct: a steady, even note; fine grey dust on concrete or a smooth paste on stone; the wheel keeps biting into the next pass without extra pressure.
- Too much pressure or too slow a pass: the note rises, water turns to steam at the contact point, dust darkens, and the segment takes on a bright, polished look. Ease off and speed up — this is the state that scorches marble.
- Too little pressure or a glazed segment: the wheel skates, the surface turns shiny instead of opening up, and there is almost no swarf. Dress the wheel and re-open it before continuing; grinding with a glazed segment polishes the floor rather than preparing it.
- The point has rounded back: the wheel stops biting on hard stone even though plenty of segment is left. Once the L point has worn back into the root, the tool has lost the geometry that made it work — re-profile it on a dressing stone if there is enough height left, otherwise replace it.
- Wandering or walking: the wheel pulls to one side. On an angle grinder this usually means too much pressure or an unbalanced wheel; on stone it can also mean the segment is glazed.
Applications & Materials
Typical jobs
| Application | What it involves | Starting grit / bond |
|---|---|---|
| Concrete slab levelling | Removing high spots, form marks and trowel ridges before a coating or overlay | #16/20 or #30/40 · medium-hard bond |
| Patch and joint feathering | Blending filled repairs and sawn joints level with the surrounding slab | #30/40 · medium-hard bond |
| Thin coating removal | Glue, paint films and light surface coatings (thick epoxy and mastic → PCD first) | #16/20 · medium bond |
| Granite and quartz slab flattening | Levelling a worktop or a slab, removing saw marks and lippage between pieces | #30/40 → #60/80 · soft bond |
| Marble and limestone dressing | Shaping edges, removing chips, preparing a face for polishing | #60/80 → #100/120 · soft bond, wet |
| Stone edge shaping | Easing or chamfering an arris before hand or machine polishing | #100/120 → #200 · soft bond, wet |
| Tile lippage and edge easing | Grinding down a proud tile corner, easing a cut edge so it does not chip | #100/120 → #200 · soft bond, wet |
| Step, threshold and nosing dressing | Grinding a step flat and easing the arris for a safe, even edge | #30/40 → #100/120 · medium bond |
| Terrazzo preparation | Opening a terrazzo surface before the polishing sequence | #30/40 → #100/120 · medium bond |
| Masonry clean-up | Brick, block and roof tile — mortar residue, level and flash removal | #16/20 · hard bond |
Suitable materials
| Material | Suitability | Note |
|---|---|---|
| Concrete, screed, mortar | Excellent | Core application; medium-hard bond for abrasive aggregate |
| Brick, block, roof tile | Excellent | Hard bond; the segment wears faster than the diamonds here |
| Granite | Excellent | Soft bond; the point-leading L is the reason it bites |
| Marble, limestone, travertine | Excellent — wet only | Finer grit and light pressure to avoid scorching |
| Engineered quartz, quartzite | Very good | Keep water running; resin burns if it gets hot |
| Terrazzo | Good | Moderate pressure to avoid pulling chips out of the matrix |
| Ceramic and porcelain tile | Good — edges only | Fine grit, light pressure, water; do not attempt to cut |
| Sandstone and slate | Fair | Highly abrasive; expect faster bond wear and use a hard bond |
| Thick epoxy and mastic coatings | Not suitable | Use Concrete PCD Grinding Cup Wheels — diamond grinds, PCD shears |
| Wood, plastic, metal | Not suitable | For bonded-abrasive metalworking see Cup Shape Diamond Grinding Wheels |
How to Use an L Shape Grinding Cup Wheel
- Check the speed, then mount. Compare the maximum rpm marked on the wheel with the no-load speed on the grinder’s rating plate and make sure the grinder is at or below it. Check the wheel for cracks or missing segments before it goes on the spindle.
- Fit the correct arbor. Match the bore — 22.23 mm plain, M14 or 5/8″-11 — and tighten the flange properly. Refit the guard: the wheel is only legal and only safe with it.
- Decide dry or wet. Concrete and granite can be ground dry with a rated extractor and a respirator. Marble, limestone, quartz and anything that will stay visible: wet only. Set the water to reach the contact point.
- Clear the area. Remove grit and debris, tape off adjacent surfaces, and mark the high spots with a straightedge or a pencil before you start, so you are grinding to a plan rather than by eye.
- Open the wheel on scrap. A new metal-bond segment can be slightly proud of its neighbours. Two or three light passes on a scrap slab or a dressing stone settles it in and shows you the bite before you commit to the work.
- Start at the high spot. Work from the highest point outward rather than from the middle of the floor. The whole object of the first pass is to bring the high spots down to the level of the rest, not to make everything lower.
- Cross-hatch. Run the first cut in one direction, then the second at roughly 90 degrees to it. This is what removes the directional pattern and prevents invisible ridges that reappear once a coating is applied.
- Overlap and keep moving. Step over by about a third of the wheel width on each pass and keep the wheel travelling. A wheel that stops in one place cuts a dish and generates the heat that scorches stone.
- Let the wheel do the work. On an angle grinder you set the pressure — and you should set it low. If you have to lean on it, the bond or the grit is wrong, not your technique. On a floor grinder the ballast sets the pressure and you manage travel speed.
- Take the reveal along walls. For the last 100–150 mm, run the wheel half on the wall so it cannot cut a trench. Grind the high side of any step, never the low side.
- Check as you go. Lay a straightedge across the work every few square metres. Correction is cheap while the surface is still rough and expensive once it is flat but wrong.
- Finish with a finer grit, then clean. Step to a finer grit for the final preparation pass, rinse the slurry off immediately, and clean the wheel and the machine before the next job. Then move to the polishing or coating stage — for floor work see Concrete Floor Polishing Pads and Diamond Grinding Plates.
Frequently Asked Questions
What is an L shape diamond cup wheel used for?
It is a general-purpose diamond cup wheel for angle grinders and floor grinders. Typical jobs are levelling concrete slabs and screed, removing trowel marks, form marks and high spots, feathering patch repairs, flattening granite and quartz slabs, dressing marble and limestone edges, removing thin glue and paint films, and chamfering or easing the cut edge of porcelain tile. It grinds concrete, stone, masonry and tile with one wheel, which is why fabricators and general contractors keep it on the van. It is a grinding wheel, not a coating stripper: thick epoxy, mastic and levelling compound should be sheared off with PCD segments first.
What does the L shape actually do that a flat segment does not?
It turns each tooth into a two-stage cutter. The point of the L leads, so the whole down-force of the machine lands on a small area and the segment bites; the wide body behind the point then follows through and flattens the scratch. A flat rectangular block presents the same full face from the first contact, so on hard stone it rubs, heats up and glazes instead of cutting. Because the L also runs cooler, you can hold pressure for longer, which is why it keeps its rate on granite where a flat block fades. The trade-off is that the thinner point wears first — once it has rounded back into the root, the wheel is finished.
Single row, double row and L shape — which one do I need?
Single row removes material fastest on a flat concrete floor because fewer segments mean more pressure per segment, but it tracks and leaves a coarser pattern. Double row distributes the load over more segments, so it vibrates less and leaves a flatter, cleaner surface, at a slightly lower removal rate. L shape sits closest to a heavy single row in bite, with better clearance and better edge access than either, and it is the one that behaves properly on stone as well as concrete. If you grind thousands of square metres of concrete, buy a T segment or double row floor wheel. If you grind whatever the day brings, the L shape is more useful.
Will this cup wheel leave swirl marks on the floor?
Less than a radial single-row wheel, and that is a deliberate part of the design. A radially laid segment scrapes the same arc every revolution, so the pattern repeats and shows up under raking light once the coating or polish goes on. The L segments here are swept back from the radius and the point leads, so the teeth meet the surface at an angle and successive passes cross the previous arcs instead of stacking them. It reduces swirl marks, it does not abolish them. On visible work, still cross-hatch at about 90 degrees and finish with a finer grit before you coat.
Can one cup wheel grind concrete, granite and marble?
It can, and this L shape wheel is the generalist that does all three competently — but no single bond and grit is optimal for all three, and pretending otherwise is how people burn a marble slab. Concrete and masonry are abrasive, so they want a medium to hard bond. Granite and engineered quartz are hard and non-abrasive, so they dull the diamonds and want a soft bond that releases them. Marble and limestone are soft, heat-sensitive and porous, so they want a soft to medium bond, a finer grit, light pressure and water. One wheel covers a normal mixed workload; for production volumes on one material, buy a second wheel matched to it.
What grit do I need for stone?
Start coarse and step down, because a fine grit cannot take a high spot out. For slab flattening and edge shaping on granite or quartz, start at #30/40 and follow with #60/80. For marble and other calcitic stone, start at #60/80 and finish at #100/120 — anything coarser leaves a scratch you have to grind out later, and any heat you make discolours the stone. For easing a porcelain tile edge, work at #100/120 to #200 with light pressure so the arris does not chip. Matching the grit to the step you are on is worth more than buying a wider grit range.
Do I need water when grinding stone?
Yes on marble, limestone, travertine and engineered quartz. These are heat-sensitive and in some cases porous: overheating leaves a permanent yellow or brown scorch on calcitic stone that has to be ground away, and fine slurry plus steel dust leaves rust bloom in pale stone if it dries on the surface. Water also helps clear the swarf the gullets are throwing. On granite and concrete, dry grinding is workable with a rated extractor; a trickle of 0.3 to 0.5 litres per minute is often enough on a handheld grinder because the open gullets keep themselves clear. If you are not set up to control dust, grind wet.
MOQ, lead time, OEM and samples?
MOQ is 100 pieces for standard sizes, bonds and grits; custom diameters, segment counts, segment heights, grit ranges, bond hardness, arbor threads and branded packaging are made to order with an MOQ of 500 pieces. Standard sizes ship in 5 to 10 days and custom production in 15 to 30 days after deposit. OEM and ODM are welcome with your own brand, colour, artwork and packaging, and samples are available at cost with the sample fee returned against your first official order. Payment terms are T/T, L/C, D/A, D/P and PayPal, loading from Shanghai or Ningbo.
OEM & Wholesale
Cup wheels are a specification-plus-branding product. The same 125 mm body can be built with different segment counts, grits, bond hardness and body colour, and two customers will disagree about which combination suits their market. Tell us the material your customers actually grind and the machines they run, and we will build to that rather than to a catalogue number.
| Outside diameter | 100 / 105 / 115 / 125 / 150 / 180 mm · other sizes on request |
|---|---|
| Arbor / bore | 22.23 mm (7/8″) · M14 · 5/8″-11 · M16 · M19 on request |
| Segment profile | L shape standard · other profiles available across the range |
| Segment count | 8 / 9 / 10 / 12, or to your specification |
| Segment height | 5 mm standard · 6 mm heavy-duty · 8 mm on request |
| Diamond grit | #6 · #16/20 · #30/40 · #50/60 · #100/120 · #200 · #300 · custom grading on request |
| Bond hardness | Soft · medium-soft · medium · medium-hard · hard — matched to your end material |
| Body material | Steel body · aluminium body option |
| Attachment | High-frequency silver brazing · laser welding · hot-press sintering |
| Body finish | Powder coated to standard colours or to your brand colour |
| Private label | Neutral white box · blister and paper insert · full colour branded carton · artwork design support |
| Certification | ISO 9001 quality system · CE · EN 13236 · RoHS on request · SGS inspection available |
| MOQ | 100 pcs standard · 500 pcs custom and OEM |
| Lead time | 5–10 days standard · 15–30 days custom, after deposit |
| Payment | T/T · L/C · D/A · D/P · PayPal |
| Port of loading | Shanghai or Ningbo, China |
Huzhou Gu’s Imp. & Exp. Co., Ltd. has manufactured diamond tools under the GUSHI and Roycel brands since 2004 from Huzhou, Zhejiang, with a production capacity of around 100,000 sets a month and customers in more than 20 countries including the USA, Canada, Germany, the UK, Italy, Brazil, Chile, Australia and South Africa. One of only 23 Chinese companies to win the diamond blade anti-dumping case in the US market, we export at a 6.2% anti-dumping tariff rate. Many of our customers have been buying from us for more than ten years.
Related products: T Segment Grinding Cup Wheels for concrete floors · Fan Shape Grinding Cup Wheels for other segment layouts · Concrete PCD Grinding Cup Wheels for coating removal · Diamond Grinding Plates for floor grinding systems · Concrete Floor Polishing Pads for the polishing stage · Cup Shape Diamond Grinding Wheels and Flat Shape Resin Bond Diamond Grinding Wheels for metalworking tool grinding · 45 Degree Angle Chamfer for tile edges · Silent Diamond Cutting Blade for cutting before grinding.