

Why Surface Profile Matters More Than Grit
Coating failure is almost never a coating problem. It is a substrate problem — and the substrate problem is almost always the wrong surface profile. Two things go wrong on a floor that has been “ground”:
- The floor is not flat. Grinding in one direction, or dwelling on one spot, leaves hollows and ridges. Every litre of self-leveller you pour afterwards chases that shape, and thick spots crack. Levelling is a pass-pattern discipline, not a grit choice.
- The surface is not open. A floor that has been polished smooth, or sealed by years of use, gives a coating nothing to key into. The coating bonds to the laitance layer rather than to the concrete, and it lifts at the edges within a season.
The industry measure for “how open” is the CSP — Concrete Surface Profile, an ICRI scale from CSP 1 (nearly smooth) to CSP 9 (very rough). Your coating manufacturer puts a number on the data sheet. Getting there is what this plate is for.
| CSP grade | Surface | Typical grit to reach it | Suits |
|---|---|---|---|
| CSP 1–2 | Nearly smooth to smooth | #100–#150, or a light pass | Thin-film coatings, sealed and decorative floors |
| CSP 3 | Light texture | #30–#60 (everyday) | High-build epoxy, self-levelling toppings, general industrial floors |
| CSP 4–5 | Medium to medium-rough | #16–#30 | Epoxy screeds, polymer overlays, heavy traffic |
| CSP 6–7 | Rough to very rough | #6–#16, multiple passes | Heavy-duty overlays, aggressive bonds |
| CSP 8–9 | Very rough to extremely rough | #6 plus scarifying or shot blasting | Cementitious urethane, coving, structural repairs |
Full Specifications
| Model | Diamond Grinding Plate Series |
|---|---|
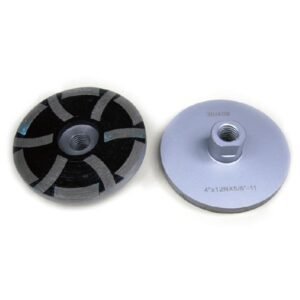
| Plate type | Bolt-on metal bond grinding plate (shoe), multi-segment |
| Plate diameter | 250 mm (10″), 300 mm (12″) — other sizes on request |
| Segment shapes | Trapezoid single arrow / double arrow / triple arrow, double rectangular (T), double-T, round segment |
| Segment sizes | 37 × 17 × 8 × 2T; 40 × 12 × 12 × 2T; 30 × 8 mm (double-T); other layouts to order |
| Segment height | 13 mm standard; 8 / 10 / 12 / 15 mm available |
| Mounting | 3× M6 thread, 3× M8 thread, D9 holes, smooth holes, magnetic backing / adapter |
| Segments per plate | 2, 3 or 4 depending on plate type and machine |
| Grit range | #6, #16, #20, #25, #30, #40, #50, #60, #70, #80, #100, #120, #150, #200, #400 |
| Bond type | Metal bond — extra soft, soft, medium, hard, extra hard, super hard |
| Bond colour code | Typical: green (extra soft) / blue (soft) / red (medium) / black (hard) / gold (extra hard) — confirm per order |
| Segment attachment | Silver brazed, laser welded or vacuum brazed |
| Plate body | Pressed steel matrix, powder coated |
| Substrate | Concrete, screed, terrazzo, asphalt; also granite, marble and sandstone in stone shops |
| Typical jobs | Levelling high spots and protrusions, feathering joints, seams and patched panels, removing thin coatings and adhesive, opening the slab to CSP |
| Not for | Thick, soft or sticky coatings (strip with PCD first); metal, nails and rebar |
| Machines | Bolt-on floor grinders — Diamatic, SASE, CPS, Innovatech / Bartell Predator, Klindex Expander, Iron Horse, HTC; magnetic adapters for cross-fitting |
| Plates per head | Commonly 3; some machines 4 or 6 — count your mounting positions |
| Operation | Dry or wet |
| Dust control | Dust shroud + HEPA vacuum required for dry grinding (crystalline silica) |
| Net weight | Approx. 0.6–1.2 kg per plate |
| Packaging | 3 pcs or 9 pcs per box; carton for bulk |
| Shelf life | No expiry; store dry to prevent segment corrosion |
| MOQ | 9 pcs per grit / bond combination |
| Lead time | 7–10 days regular; 15–30 days custom |
| OEM | Logo, plate colour, segment layout, packaging, custom mounting pattern |
| HS code | 8207.90 — confirm with your customs broker |
| Certification | ISO 9001 factory; CE / EN 13236 documentation on request |
| Price range | US$6–28 per plate depending on size, segment type and bond |
Choose the Bond by Concrete Hardness
This is the single most valuable table on the page, and it runs opposite to intuition. Hard concrete needs a soft bond. Soft concrete needs a hard bond. Here is why: a hard bond holds its diamond grit tightly. On soft, abrasive concrete that is what you want — the floor wears the diamond dull before the bond releases it, so a hard bond keeps cutting. On hard concrete, a hard bond never wears back at all, the metal glazes over and the plate just polishes the floor. A soft bond sheds grit and keeps exposing fresh diamond, which is exactly what hard concrete requires.
| Concrete | Compressive strength | C grade | Mohs | Recommended bond |
|---|---|---|---|---|
| Very soft | Under 2,000 psi / ~14 MPa | ~C20 | 2–3 | Extra hard (gold) |
| Soft | Under 2,500 psi / ~17 MPa | ~C25 | 3–4 | Hard (black) |
| Medium | 2,500–4,000 psi / 17–28 MPa | C25–C40 | 4–5 | Medium (red) |
| Hard | 4,000–5,500 psi / 28–38 MPa | C40–C55 | 5–7 | Soft (blue) |
| Extra hard | Over 5,500 psi / 38 MPa+ | C55+ | 7–8 | Extra soft (green) |
| Super hard | Over 7,000 psi / 48 MPa+ | C70+ | 9 | Extra soft / super soft |
How to confirm you got it right, from the plate itself: a glazed, shiny, polished-looking segment means the bond is too hard for this slab — drop one grade. A segment that wears down fast while the floor is barely changing means the bond is too soft — go up one grade. Diagnosing this on the first pass saves you the rest of the job.
Related prep tools: PCD Grinding Cup Wheels, Concrete Floor Polishing Pads, Diamond Sanding Sheets.
The Grit Progression — Do Not Skip a Step
Metal bond grits are not interchangeable; each one does a different job in the sequence. Jumping straight to a fine grit on a rough floor is the most common way to waste a day.
| Grit | What it does | Scratch pattern | Use it for |
|---|---|---|---|
| #6 / #16 / #20 | Cuts deepest — the first step | Deep, open | Removing old rough surface, overlay, thin coatings; opening the slab and exposing fresh substrate |
| #30 / #40 | Everyday concrete grinding | Even, obvious | The standard pass — opens an old floor surface and sets a workable CSP fast |
| #50 / #60 / #70 / #80 | Further grinding | Medium | Refining after the coarse pass; levelling and evening out the scratch pattern |
| #100 / #120 / #150 | Finest metal-bond step | Fine | The last preparation pass before resin pads, densifiers or a thin coating |
Follow the sequence in order: coarse to remove and open, then step up to refine. Each grit removes the previous grit’s scratch pattern — skip one and you will spend longer on the next step than you saved, or you will leave deep scratches under a thin coating where they will show through.
Segment Shape and Machine Mounting
Two practical choices, and both matter more than most buyers expect.
| Segment shape | Character | Best for |
|---|---|---|
| Trapezoid — single arrow | Aggressive, strong bite | Heavy stock removal, hard coatings, hard slabs |
| Trapezoid — double / triple arrow | More segments, more even | General grinding, large areas, consistent scratch |
| Double rectangular (T) | Rides up and over irregularities | Bump grinding, uneven and patched floors, feathering seams — the shape to choose when the floor is not flat |
| Double-T | Rounded edges, fewer scratches | Concrete polishing first steps, staining and dyeing work |
| Round segment | Smooth, uniform profile | Following a trapezoid pass; finer, more even surface |
The double rectangular layout is worth calling out: because it sits as a bar rather than a block, it lets the tool ride up and over sharp surface irregularities instead of catching on them. On a floor with bumps, curled panels or patched seams, that is the difference between a level floor and a chewed-up one.
Mounting
Plates are supplied to suit the machine: 3× M6 thread and 3× M8 thread are the most common, with D9 holes and smooth holes for other systems. Magnetic backing and adapters let a single plate fit several machines — useful if your fleet is mixed or if you hire grinders. Count the mounting positions on your head before ordering, and tell us the machine model; we will match the pattern.
Grinding Plate vs Cup Wheel vs Polishing Pad
Three tools that look similar and do completely different work. Confusing them is behind a lot of wasted time and failed coatings.
| Factor | Grinding Plate | Cup Wheel (hand-held) | Resin Polishing Pad |
|---|---|---|---|
| Machine | Bolt-on floor grinder | Angle grinder | Floor grinder |
| Job | Level and open the slab, set CSP | Edges, corners, small areas | Refine and polish |
| Reach | Open floor areas | Edges and tight spots | Open floor areas |
| Bond | Metal — aggressive | Metal — aggressive | Resin — fine |
| Leaves | Controlled CSP profile | Scratch pattern | Semi-polish to mirror |
| When to use | First, after PCD strip | Where the grinder cannot reach | Last, once the floor is flat and open |
| If you get it wrong | Coating fails to bond | Uneven edges around the whole floor | Polishes over defects instead of removing them |
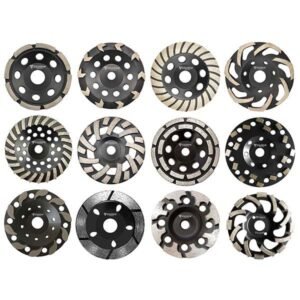
The practical rule: a floor grinder gets the field, a cup wheel gets the edges, and they have to match. The most common defect on a finished job is a floor that is beautifully prepared in the middle and glossy and un-profiled in a 100 mm band around every wall — because the operator only ran the big machine. Always chase the edges with a hand-held cup wheel before you call the prep done.
Operating Guide
- 1. Strip first if you need to. Thick, soft or sticky coatings come off faster with a PCD plate. Do not fight them with diamond.
- 2. Check the slab hardness. Pick the bond from the table above before you start — concrete grade, age and aggregate all change it. If in doubt, test on a small area.
- 3. Count your plates. Three per head on most machines; order enough for a full set plus spares, because a mismatched set grinds the floor out of level.
- 4. Set the machine level and check the float. Confirm all plates sit at the same height. One plate standing proud will cut a groove across the whole floor.
- 5. Grind in a cross-hatch pattern. Pass one direction, pass a second time at 90°. This is what flattens the floor — single-direction grinding always leaves ridges.
- 6. Keep moving. Never dwell in one spot. Dwelling is how hollows and burn marks get made.
- 7. Watch the segments, not the clock. Glazed segments mean too hard a bond or too high a speed; fast wear with little progress means too soft. Adjust early.
- 8. Chase the edges with a cup wheel. Hand-held tool for the perimeter band the grinder cannot reach. Match the grit so the edge profile matches the field.
- 9. Check the CSP before you finish. Replica tape or a profile gauge, compared against the number on the coating data sheet.
Applications
- Levelling high spots, bumps and protrusions on a rough or uneven concrete floor.
- Feathering uneven joints, slab seams and panels so a self-leveller can flow evenly.
- Grinding down patched areas, curled footpath panels and raised repairs.
- Removing thin coatings, adhesive residue and paint before re-coating (with PCD first where the coating is thick or sticky).
- Opening and profiling a slab to the CSP specified on a coating data sheet.
- Warehouse, factory, retail and office floor renovation ahead of epoxy, PU or resin systems.
- Surface preparation before polishing, densifying, staining or dyeing concrete.
- Removing laitance and weak surface layers so a topping bonds to sound concrete.
- Stone shop work — flattening and grinding granite, marble and sandstone slabs.
Related products: Concrete PCD Grinding Cup Wheels, Concrete Floor Polishing Pads, Resin Fickert.
OEM & Wholesale
GUSHI supplies diamond grinding plates to surface preparation contractors, flooring companies, concrete polishing specialists, tool distributors and rental fleets worldwide. We build custom plate diameters, segment shapes (trapezoid, double-T, round, arrow), segment heights, grits, bond hardnesses, colours and mounting patterns to suit any machine, and we support OEM/ODM and private label. Samples are available for testing; the sample fee is returned against your first official order.
Frequently Asked Questions
What is a diamond grinding plate used for?
Preparing a concrete floor for what comes next: levelling high spots and protrusions, feathering uneven joints and slab seams, grinding down patched and curled panels, removing thin coatings and adhesive, and opening the slab so a coating, topping or polish has something to bond to. It is a surface preparation tool — for thick or sticky coatings you strip with a PCD plate first, then refine with this one.
What is the difference between diamond grinding plates and PCD plates?
PCD plates remove what is sitting on the concrete — epoxy, glue, mastic, membrane, paint. Diamond grinding plates work the concrete itself. On a strip-and-recoat job: PCD to get the coating off, then a diamond plate to take out the PCD scratch pattern and set the surface profile the new coating needs.
What is CSP and which grade does my floor need?
CSP (Concrete Surface Profile) is the ICRI scale from CSP 1, nearly smooth, to CSP 9, very rough. Coatings manufacturers specify a number because adhesion depends on it. Broadly: CSP 1–2 thin-film and sealed floors, CSP 3–4 high-build epoxy and self-levelling toppings, CSP 5–6 epoxy screeds and heavy-duty overlays, CSP 7–9 aggressive bonds like cementitious urethane. Work to the number on your data sheet, and verify with replica profile tape — not by eye.
How do I choose the bond hardness?
Opposite to intuition: hard concrete needs a soft bond, soft concrete needs a hard bond. A hard bond holds its grit — right for soft, abrasive slabs. On hard concrete a hard bond never wears back, glazes over and just polishes the floor; a soft bond sheds grit and keeps exposing fresh diamond. Check the slab’s compressive strength and confirm on the first pass: a shiny glazed segment means too hard, fast wear with no progress means too soft.
Which grit should I start with?
Start coarse and work up — do not skip to a fine grit. #6/#16/#20 cuts deepest and opens the slab. #30/#40 is the everyday concrete grinding grit. #50–#80 refines the scratch pattern. #100/#120/#150 is the last metal-bond step before resin pads or a coating.
Can a diamond grinding plate remove coatings, or do I need PCD?
It removes thin coatings, and on light jobs a coarse plate does it in one pass while profiling the floor at the same time. Thick, soft or sticky material is a different story — hard epoxy, elastomeric membrane, carpet adhesive and mastic will load and glaze a diamond plate. If the coating is thick, flexible or gummy, strip with PCD first.
Wet or dry grinding — which is better?
Both work. Dry is common on prep jobs but needs a dust shroud and HEPA vacuum, because concrete dust contains crystalline silica. Wet keeps dust down and runs cooler, possibly extending segment life, but creates slurry to manage. Many crews dry-grind with a good vacuum plus a light water mist — dust controlled without a flood.
How many plates do I need and which machines do they fit?
Most walk-behind grinders take three plates per head; a few take four or six — count your mounting positions. Plates come with 3× M6, 3× M8, D9 holes, smooth holes or magnetic backing for machines including Diamatic, SASE, CPS, Innovatech/Bartell Predator, Klindex Expander, Iron Horse and HTC. Tell us your machine and we will match the mounting.
MOQ, lead time, OEM and samples?
MOQ 9 pcs per grit and bond combination — a set for a three-head machine. Custom diameters, segment shapes, heights, grits, bonds, colours and mounting patterns made to order. Regular orders ship in 7–10 days, custom in 15–30 days after deposit. OEM/ODM and private label welcome; samples available with the fee returned on your first official order.