1. What the disc is, and why flaps
Start with the construction, because every claim downstream depends on it. A flap disc is a ring of overlapping abrasive sheets, angled so that only a small leading edge of each flap touches the work. That geometry gives three properties a rigid grinding disc cannot match: the contact area stays small and forgiving; each flap flexibly follows the surface, including curves and bullnose profiles; and wear spreads across dozens of flaps instead of concentrating on one rim. It is the geometry that made zirconia flap discs the default finishing tool in metalwork.
Why this product is appearing on shelves now
Three market shifts converged to make a diamond flap disc viable as a stock line rather than a special order. Porcelain slab — 1.2 by 2.4 m and larger sintered-format material — moved from a niche Italian product to the default countertop and wall cladding across every export market, and its edges all need the same finishing chain. Second, fabricators learned that glazed and sintered surfaces punish zirconia abrasives badly enough that consumable cost per metre became a talking point rather than a footnote. Third, variable-speed angle grinders became standard issue, which matters because plated diamond does its best work in a controlled speed band. A tool that was technically possible a decade ago only became commercially inevitable with those three shifts — which is also why it is a category worth shelf space now, ahead of the copy products that follow any inevitable category.
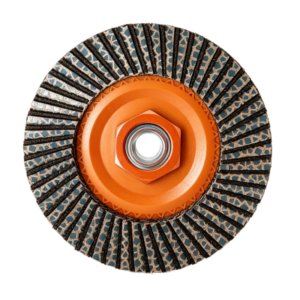
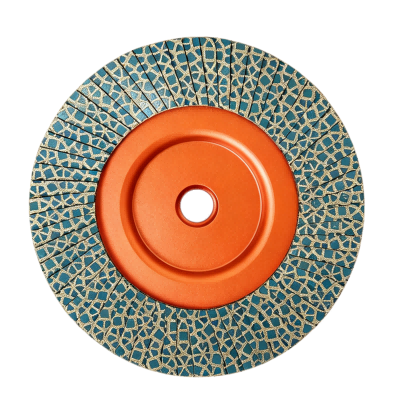
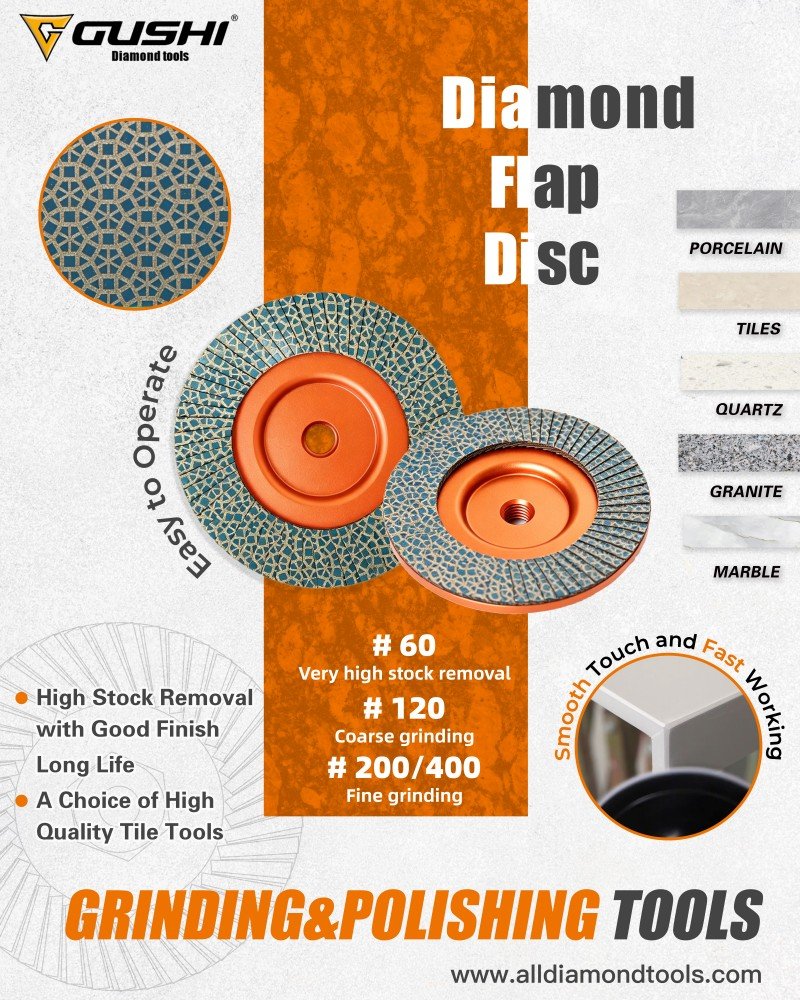
This disc keeps the geometry and swaps the abrasive economics. The flaps are cut from electroplated diamond sheet: synthetic diamond grain bonded into a plated nickel layer on a fabric-backed flexible substrate, the plated surface carrying the honeycomb pattern visible in the product poster — islands of nickel-diamond separated by grooves that act as swarf channels. Diamond against ceramic does not wear round like zirconia against steel; it cleaves along crystal planes into new sharp edges. The result is a flap disc that keeps its scratch pattern consistent for most of its life instead of burning and glazing in its first minutes on porcelain.
Where flaps win, and where they do not
Flaps win on edges, profiles, mitres, inside corners and anything rounded — precisely the surfaces porcelain slabs, quartz tops and stone fabricators finish every day. They lose where raw removal dominates: a rigid diamond cup wheel carries ten times the diamond area and flattens concrete or masonry far more cheaply. The comparison table in section 9 draws that line precisely, and section 6 lists where this disc belongs and where it does not. A distributor who stocks both constructions and routes buyers correctly wins the whole job instead of half of it.
How the electroplating works, mechanically
Electroplating is the oldest industrial way of making diamond abrasive, and still the right one for flexible products. The fabric-backed sheet passes through a plating bath where an electric current deposits nickel around each seeded diamond grain, growing a metal bond that locks the crystal mechanically — no sintering heat, no resin, no curing temperature to distort the backing. The process leaves the grain standing proud of the bond at roughly a third of its height, which is the sharpest, most aggressive exposure of any diamond bond type: every crystal is a small chisel with its point fully presented.
Two consequences matter to a buyer. First, electroplated products cut fastest per gram of diamond of any construction — the reason #60 on this disc removes stock like a much coarser tool. Second, the total diamond budget is one plated layer, so lifespan is governed by how well the layer is protected from heat and loading — which is what the honeycomb pattern (section 4) and the speed discipline (section 7) are for. Buyers comparing suppliers should ask about plating thickness at the working grit and whether plating coverage is batch-inspected; both are the difference between a disc that runs its full layer and one that sheds its layer.
2. Grit is the product: the #60 → #400 chain
On a metalwork flap disc, grit choice is a small decision. On this product it is the whole decision, because the disc is a finishing tool and finishing is sequential: each stage has one job, and that job is defined by the scratch pattern it must erase. The poster’s four grit levels map onto the standard slab-edge workflow as follows.
| Grit | Poster duty | What it actually does on the edge | Typical pass |
|---|---|---|---|
| #60 | Very high stock removal | Flattens the saw-cut step, rounds the arris, cuts 2–3 mm chamfers; the only stage that removes real material | 0.3–0.6 mm per pass, porcelain |
| #120 | Coarse grinding | Erases the #60 scratches; establishes the uniform matte surface that every later stage assumes | Light, even, one full pass around the edge |
| #200 | Fine grinding | Takes the matte toward a soft sheen; removes the #120 scratch family; ready for honed-material finish | Light, low pressure |
| #400 | Fine grinding | Near-polish; final stage for honed and matte materials, and the hand-off to 800–3000 resin pads where a full gloss is wanted | Feather light, keep moving |
Three rules that make the chain work
- Do not skip stages. Jump from #60 to #400 and the deep scratches simply get polished into the surface, visible the moment light rakes across it — then you go back to #120 and start again. Skipping saves one disc and costs the job.
- Each stage ends when the previous scratch pattern is gone. Wipe the edge and look, do not count minutes. On porcelain the #120 stage is the checkpoint: if its scratches are uniform, #200 and #400 will run fast.
- Stock all four or sell none. A customer who buys #60 alone comes back disappointed that the edge is not finished; a customer who buys the chain comes back for consumables. The mixed-grit carton in section 13 exists for exactly this reason.
A note on grit numbering
The # numbers on this page follow the common commercial shorthand, but two numbering systems circulate in abrasives and buyers quote both. FEPA (European, F-prefix: F60, F120, F200-class) and the American CAMI scale diverge at the fine end — a CAMI 220 is close to a FEPA F230, but a CAMI 400 is finer than a FEPA F400 nominally suggests. On packaging destined for more than one market, print the system explicitly (“#400 (FEPA F400)”) rather than a bare number, and keep the chain ladder consistent across the sleeve, the box and the catalogue. The cost of the extra characters is one mis-ordered fine-grit SKU avoided.
Where a single grit is enough
Two honest exceptions. Back-bevel and chamfer work before tiling — where the edge gets covered anyway — is #60-only territory. And marble fabricators working soft light stone sometimes run #120 straight to #400, skipping #200, because marble cuts fast enough that the intermediate stage is barely needed. Both exceptions are workflow facts, not product facts; the chain is the default.
Why diamond scratches behave differently from abrasive-cloth scratches
The reason the chain matters more here than on metalwork discs is the character of the scratch a diamond leaves. Zirconia scratches are soft-walled grooves in a ductile metal — they smear and partially self-blur, so a coarse scratch half-disappears under a finer pass. Diamond scratches in ceramic are clean-fractured grooves in a brittle surface: they do not blur, they only get erased by the next grit. That is why an un-erased #60 scratch survives polishing and shows in raking light on a “finished” edge, and why the wipe-and-look checkpoint between stages (section 7, step 8) is not optional discipline but the actual quality control of the whole system. It is also, in fairness, why the finished #400 surface on porcelain is so crisp: brittle-surface scratching at fine grit produces the cleanest reflectance any abrasive family can leave.
3. Why glazed edges stay chip-free
Chipping is the failure that costs porcelain fabricators the most money — a chipped edge on a 1.6 m sintered-stone countertop is a scrapped top. It is also the failure the flap construction attacks directly, and it is worth spelling out the mechanism, because “chip-free” on a poster means nothing until the physics behind it is on the page.
Why rigid tools chip glaze
A fired glaze is a thin, very hard, brittle layer over a softer body. A rigid grinding contact — a cup wheel face, a flat grinding wheel — hits it with a hard line contact and one depth of cut. Every local hardness variation in the glaze becomes a stress concentration; every corner becomes a lever point. The chip that results propagates along the glaze-body boundary, which is why porcelain chips run further than the contact point and why they cluster at arrises and inside corners.
Three things the flap does differently
- Compliant contact. The leading edge of each flap yields under load, so pressure spikes spread into the flap stack instead of into the glaze. Depth of cut becomes the operator’s choice rather than the machine’s.
- Small, moving contact. Only a small edge of each flap touches at any instant, at a 10–15° angle. The cutting point travels; it does not dwell on one defect.
- No corner grab. Because the contact is an angled feather-edge rather than a flat face, the disc cannot lever against an inside corner. The operator still has to respect corners — section 7 step 6 — but the tool no longer initiates the failure.
4. What the honeycomb pattern does
The plated surface in the poster inset is not decoration. In electroplated diamond products the pattern of the nickel bond is a design variable, and the honeycomb — a grid of diamond-bearing islands separated by grooves — earns its place with three functions that matter more as grit gets finer.
- Swarf channels. Ground porcelain dust is fine, dense and abrasive. The grooves between islands give it somewhere to go; a fully plated face can pack solid and start rubbing instead of cutting, which is how fine-grit discs glaze.
- Flexible backing. The pattern thins the bond layer at controlled points, which is what lets the sheet flex enough to be made into flaps at all — and lets the flaps follow a bullnose without cracking the plating.
- Heat relief. Less bonded area in contact means less friction heat per pass, which matters on dark marble and quartz where scorch marks show instantly.
Pattern scale tracks grit: on #60 the islands are coarse and widely spaced because the swarf is coarse; on #400 they are fine and dense because the swarf is powder. Buyers comparing electroplated discs across suppliers should compare plating coverage, bond thickness and pattern consistency at the working grit — not just the grit number — because two #200 discs with different patterns can behave a generation apart.
Reading pattern quality at goods-in
Three checks, none needing a laboratory. First, coverage: hold the #120 disc to the light and look for un-plated patches or thin islands — coverage gaps become dead zones on the edge and show as periodic scratches. Second, bond height consistency: run a fingertip across the pattern; a wave-like variation in island height predicts uneven wear and chatter marks. Third, flexibility: flex a whole disc gently — a plating that cracks or flakes audibly at a modest bend will not survive a bullnose. Batch-plated product from an inspected line passes all three trivially; spot-bought plating usually fails the second. These checks cost thirty seconds per carton and intercept the one construction defect technique cannot compensate for.
5. Forms and machine fit: bore, M14 hub, standard vs mini
The poster shows both mounting forms, and the choice between them is a workflow decision worth making deliberately.
| Attribute | Bored disc | M14 threaded hub |
|---|---|---|
| Mount | Under the standard grinder flange, like any flap or cutting disc | Screws directly onto the grinder spindle |
| Change speed | Spanner, approx. 20–30 seconds | Hand-tight, seconds |
| Runout | Depends on flange condition and centreing | Fixed by the hub; lowest and most repeatable |
| Best buyer | Tile fitters who already run a standard grinder stock | Stone shops and counters running full grit chains in a session |
| Packing volume | Flat, lowest | Slightly deeper due to hub |
Standard disc vs Mini disc: who buys which
The standard diameter on this page is the metre-age tool: slab edges, countertop arrises, tile back-bevel chamfers — long, straight, supported surfaces on a full-size angle grinder. The Mini Diamond Flap Disc carries the same electroplated construction in a smaller diameter for mini grinders, inside cuts, small mitres and tight radii, where a full-size disc is too stiff and drags on the wrist. Distributors should stock the chain in both diameters rather than choose: the standard disc does the metres, the mini does the corners, and customers who own both reorder both.
6. Applications and materials
The disc is a brittle-hard-material finishing tool. Both tables below are written to route buyers correctly — including away from it where something else is the better sale.
Where it is used
| Application | Grit chain | Form | Notes |
|---|---|---|---|
| Porcelain slab edge finishing | #60 → #120 → #200 → #400 | Bore or hub | The core application: sintered stone, full-body porcelain |
| Quartz countertop arris and profile touch-up | #60 → #120 → #200 | Hub | Follow the router profile; flaps conform to the radius |
| Granite edge blend after saw cutting | #60 → #120 | Bore or hub | Wet optional; keep the stone supported |
| Marble edge and profile refinement | #120 → #200 → #400 | Hub | Low speed, light passes; marble burns visibly |
| Ceramic tile back-bevel and chamfer | #60 | Bore | Single-grit application before tiling |
| Glass and glazed feature edges | #200 → #400 | Bore | Light water, cushion the breakthrough corners |
| Matte and honed final finish | #400 as final | Both | Honed materials stop here; gloss continues to resin pads |
Material routing
| Material | Suitability | Coolant | Best tool if not this |
|---|---|---|---|
| Porcelain / sintered stone | Ideal — the design target | Dry or wet | — |
| Engineered quartz | Excellent | Dry OK, wet for production | — |
| Granite | Excellent | Wet preferred | — |
| Marble | Good — low speed | Wet preferred | — |
| Ceramic tile | Excellent | Dry | — |
| Glass | Good, fine grit only | Light wet | Electroplated pads for flat work |
| Concrete / masonry, heavy removal | Wrong tool | — | Diamond cup wheels |
| Steel and metals | Not applicable | — | Zirconia flap discs |
The metal row is worth restating in the aisle, not just on the page: diamond does not cut steel — iron dissolves carbon from diamond at grinding temperature, and steel swarf loads the plated face within minutes. Customers reaching for any diamond disc for metalwork should be routed to zirconia flap discs or resin cut-off wheels; the related-products block links both families.
Dust: the compliance dimension of dry grinding
Dry edge-grinding porcelain and engineered stone produces respirable crystalline silica, and every export market worth shipping to now regulates it — from OSHA’s silica rule in the United States to equivalent controls across the EU. This matters to a flap-disc programme commercially, not just ethically: the discs are sold into exactly the workflows regulators target. Three positions to take at the counter. The flap construction is already the low-dust choice among grinding formats, because its small compliant contact throws less airborne fines than a rigid wheel grinding the same line. On enclosed jobs, wet grinding with the same disc solves compliance completely and extends disc life as a side effect. And the sleeve insert is the right place for a dust-management note — the same insert recommended for the speed chart in section 13 — because a customer kept safe and compliant is a customer who keeps buying consumables.
7. The edge workflow, step by step
- Stage the chain. Lay out #60, #120, #200, #400 in order before starting. A chain is run in one session on one setup; stopping to hunt discs between grit stages is where finishes get compromised.
- Fit the disc correctly. Bore form: centre on the flange, torque the flange nut properly, check the disc runs true. Hub form: hand-tight onto M14, confirm the hub is fully seated before trigger.
- Check the speed. Variable-speed grinder to mid band (roughly 6,000–10,000 RPM working range on a standard diameter). Fixed-speed high-RPM grinders: accept shorter disc life or change machine.
- Support the work. Slab edge on felt-battened supports with the edge overhanging 30–50 mm, so the cut face cannot vibrate. Vibration is the raw material of chips.
- Start #60 flat on the face side. Flaps to the work at 10–15°, contact away from the arris, and let the disc come to the edge — not the edge into the disc.
- Work the arris last, not first. On each pass round the edge, finish with a light kiss on the arris to round it. Never open a stage by grinding straight into a corner; corners chip, faces forgive.
- Flatten the saw-cut step in #60 at 0.3–0.6 mm per pass, moving continuously. Dwelling burns the resin in the slab matrix and leaves a divot the later stages will show.
- Checkpoint: wipe and rake-light the edge. When #60 scratches are uniform, move to #120. When #120 is uniform, #200, then #400. Two minutes of looking saves an hour of rework.
- Drop pressure at every finer stage. #120 takes half the pressure of #60; #200 half again; #400 a feather. Finishing pressure is about scratch depth control, not removal.
- Finish #400 with the lightest passes of the job — it removes the #200 pattern and sets the final reflectance. On honed material, stop here.
- Wet-sponge between stages on dark stone to inspect honestly: dust hides scratches, and dark materials show every one you missed.
- Store discs flat, grit-side protected. Plated flaps chip like their abrasive: sleeve each disc, keep the chain together in the box, and the #400 that runs last should not pay for the #60 that ran first.
Dark stone and marble: the wet variant of the same workflow
On black granite, dark marble and dark quartz, the workflow above runs unchanged except for one addition: water. Dark materials show two faults that light materials hide — heat scorch and half-erased scratches — and both are managed with a trickle feed or a sponge partner wetting ahead of the disc. The working angle, the chain order and the raking-light checkpoint are identical; only the pace drops, because a wet edge must be wiped genuinely dry before each inspection or the scratch reading lies. Shops converting from dry to wet on dark work typically see disc life double first and finish complaints halve second, in that order, and the conversion costs nothing but a squeeze bottle and the discipline to use it.
8. Full specifications
Values marked “to confirm” await the final catalogue sheet; the poster specifies the grit ladder and material list, and the rest reflects the standard construction of this product family.
| Parameter | Specification |
|---|---|
| Product name | Diamond Flap Disc (GUSHI Grinding & Polishing Tools range) |
| Abrasive | Synthetic diamond, electroplated in nickel bond |
| Plated pattern | Honeycomb islands with swarf grooves; pattern scale matched to grit |
| Flap construction | Overlapping flexible plated sheets, riveted to backing plate |
| Backing plate | Fiberglass or engineering plastic, printed with maximum rated speed |
| Grit chain | #60 stock removal / #120 coarse / #200 fine / #400 polish preparation |
| Forms | Bored disc (standard flange mount) and M14 threaded hub; availability to confirm |
| Diameter | Standard angle-grinder size, to confirm (poster shows no diameter) |
| Working angle | 10–15° to the surface |
| Working speed | Approx. 6,000–10,000 RPM; never exceed the plate rating |
| Stock removal, #60 | Approx. 0.3–0.6 mm per pass on porcelain (modelled) |
| Materials | Porcelain, sintered stone, ceramic tile, quartz, granite, marble, glass |
| Not for | Steel and metals; heavy concrete removal (cup wheels) |
| Coolant | Dry standard; wet preferred on marble and production quartz |
| Sibling product | Mini Diamond Flap Disc — same construction, small diameter |
| Quality system | ISO 9001:2015; 100% batch inspection; SGS on request |
| MOQ | 500 pieces per configuration; mixed-grit carton within MOQ |
| OEM | Grit chain, printing, backing-plate logo, private-label packaging |
#60 / #120 / #200 / #400 chain
working angle, chip-free contact
bore disc or M14 threaded hub
9. Against zirconia flap disc, cup wheel and polishing pad
Four tools, four jobs, one shelf. Green marks the winner per dimension; note the diamond flap disc wins the finishing dimensions, loses the raw-removal ones, and the honest shelf carries all four.
| Dimension | Diamond flap disc | Zirconia flap disc | Diamond cup wheel | Resin polishing pads |
|---|---|---|---|---|
| Abrasive | Electroplated diamond | Zirconia alumina cloth | Sintered / brazed diamond | Resin-bond diamond |
| Cut action on ceramics | Micro-fractures, stays sharp | Dulls fast, burns glaze | Cuts hard but rigid | Polish only, no stock removal |
| Conforming to profiles | Excellent — flaps follow | Good | Rigid, catches curves | Excellent on flexible backer |
| Chip risk on glazed porcelain | Low — compliant contact | Medium | High on arrises | Minimal |
| Stock removal rate | Moderate | High on metal, poor on ceramic | Highest | Minimal |
| Life on porcelain | 20–40× zirconia (modelled) | Minutes to glaze | Long | Moderate |
| Finish ceiling | #400 near-polish | Matte scratches only | Coarse scratch | Mirror gloss to 3000 |
| Machine | Any angle grinder | Any angle grinder | Angle grinder / polisher | Grinder / polisher, wet or dry |
| Swarf behaviour | Channels clear, cool | Loads with ceramic dust | Needs heavy dressing | Needs rinse between grit |
| Indicative unit cost | Mid | Low | Mid–high | Mid, sold in sets |
| Best for | Edge and profile finishing on porcelain, quartz, stone | Steel and metalwork | Concrete and heavy flattening | Gloss stages after #400 |
The table answers the question distributors actually face at the counter: the zirconia flap disc stays the right answer for metal, the cup wheel for concrete, the polishing pad set for gloss — and between saw cut and polish on porcelain, quartz and stone, the diamond flap chain owns the middle of the job.
10. Lifespan and stock removal: what to verify
The poster says “long life” and “high stock removal with good finish”. Both are testable in an afternoon, and a distributor who runs this once sells the product better than any brochure can.
- Freeze the material: one porcelain slab, same batch, cut into edge samples of identical length with the same saw — the saw-cut step height (typically 0.3–1 mm) becomes your stock-removal yardstick.
- Freeze the machine and operator: one grinder, same RPM band, same person, same pass rhythm.
- Time to flatten: #60, measured seconds per metre to remove the saw step completely. That number, against the same figure for a zirconia flap disc (which will burn before finishing), is the stock-removal claim made concrete.
- Run the chain on one edge and photograph at each stage under raking light. The four-photo sequence is the “good finish” claim, documented.
- Count edges to death: run #60 across repeated sample edges until removal rate halves; that count, times typical job sizes, is the life band for your market. Modelled planning band: 25–40 slab edges of 2 m per disc.
- Send us the numbers — material, RPM, pass counts, photos. A miss becomes engineering feedback; a hit becomes your own marketing data, and we will credit it.
What separates a verification from a demo
A demo shows one edge with one disc and an audience; a verification changes one variable at a time, records numbers, and would survive the customer’s own foreman repeating it unsupervised. The distinction is commercial, not academic: distributors who run verifications get to print their own numbers on their own sleeves, which no competitor can copy without repeating the work. That document — four photographs, two timing columns, one life count — is also the single most effective attachment our experience says an importer can put in front of a stone-shop buyer, because it is the only sales material in the category that was generated on the buyer’s own material.
The hand-off to gloss: where this product stops
The #400 stage is the honest ceiling of this product and the boundary should be stated to buyers rather than blurred. On honed and matte materials — and on most porcelain slab programmes, which finish matte — #400 is the final stage and the chain is complete. Where a customer wants mirror gloss on granite, quartz or marble, #400 hands over to a resin polishing pad sequence at 800, 1500 and 3000 grit; the flaps cannot take a surface to gloss because gloss needs a resin-bond polish, not an abrasive scratch, and selling the two products as one workflow is what keeps the polishing-pad sets moving. Fabricators who try to stretch a #400 flap disc to a gloss come back with two complaints — the shine is wrong and the disc is worn — both of which a one-sentence expectation set at the counter prevents.
11. Troubleshooting: glazing, chips, burns and short life
Every complaint about diamond flap discs resolves into one of four symptoms, and three of the four are technique or speed, not product. The table is written for the counter: when a customer returns with a symptom, this is the diagnosis tree.
| Symptom | What it looks like | Cause | Fix |
|---|---|---|---|
| Glazed disc | Face turns shiny-smooth, stops cutting, squeals | Speed too high or pressure too heavy; bond packed with fine swarf | Dress lightly on coarse abrasive stone, drop one speed band, cut pressure in half |
| Edge chipping | Shell-out along arrises, runs along the glaze line | Unsupported work, disc opened on a corner, angle too steep | Support the slab, start on the face, work arrises last at 10–15° (section 7) |
| Burn marks | Brown or grey scorch on marble, quartz dulls | Dwelling in one spot; speed too high for dark stone | Keep moving, wet-grind dark materials, drop to the #120 stage to re-blend |
| Genuinely short life | Plating worn through in a handful of edges | Wrong material (metal, heavy concrete) or counterfeit plating | Check the routing tables in section 6; buy plated product with batch inspection |
One diagnostic habit closes most of these loops: look at the worn disc before arguing about the job. A glazed face reads as polish; a loaded face reads as caked dust; a burned face reads as discoloured nickel; genuine end of life reads as flaps worn to the substrate. Each appearance points at a different fix, and none of the first three is a warranty claim — which is worth stating politely and early in any distributor conversation.
The vibration factor nobody measures
Between the tool and the technique sits a variable most shops never control: the grinder itself. Worn spindle bearings, a bent flange or a chuck-key-balanced disc multiply the chip risk on glazed material far beyond anything the abrasive does. Two cheap habits isolate it: run the disc in free air before every session — a disc that howls or thrums at working speed has a mounting or backing-plate problem, not a customer problem; and rotate between two discs of the same grit on long jobs, because a disc that has gone oval from a drop will telegraph every hit into the edge as a chip. Shops that adopt both habits report the “random” chipping complaints largely disappearing — and the complaints that remain become genuinely diagnostic.
12. Cost per metre: the economics argument
The unit price of a diamond flap disc is several times a zirconia disc, and a buyer who stops the comparison at the price tag will make the wrong call. The comparison that decides the purchase is cost per finished metre of edge — and on porcelain it is not close.
The worked example
Take a 3 m countertop edge, saw-cut, to be finished through #60 and #120 equivalent on glazed porcelain, at list-price-scale figures:
| Line | Diamond flap chain | Zirconia flap disc |
|---|---|---|
| Disc price index (per disc) | 100 | 8 |
| Discs consumed for the job | ~0.03 of a #60 disc life | 2–3 (burn and glaze on porcelain) |
| Abrasive cost index for the job | ~3 | 16–24 |
| Machine time for the job | Baseline (single-pass stages) | Roughly double — re-work after burning |
| Re-work / scrap risk | Low with technique | Burn lines re-grind; chips scrap tops |
Even at the mid-points of those bands, the diamond chain wins the abrasive cost line on porcelain by roughly a factor of five before labour is counted, and labour is the largest number on any fabrication job. On metal the picture inverts completely — zirconia is cheaper per job by an order of magnitude — which is exactly why section 9 keeps both on the shelf. Present the economics per material, never per disc.
What this means for the stock programme
Three commercial consequences follow. Stock depth belongs in the porcelain-and-stone grit chain, not in one-grit wonders; the counter pitch is cost per finished metre, with the worked example printed on a sleeve insert; and the mixed-grit carton (section 13) is the correct default order form because it forces the chain into the customer’s hands complete. Distributors who merchandised it that way report the re-order cycle shortening, because the customer discovers the finish quality — and finish quality is what re-orders, not price.
The retail shelf version of the same argument
For DIY and retail channels the worked example above is too shop-scale to move units, so translate it into three shelf arguments. The disc outlasts a drawer-full of ordinary discs on tile — one physical disc held against a small stack of cheap ones communicates it faster than any percentage. The four-grit box is a project, not a purchase: gloss-free, honest, aimed at the buyer who is fitting one bathroom and wants the edge to look professional, which is also the buyer least equipped to burn a glaze and most likely to blame the disc. And the price gap against ordinary flap discs, presented per project rather than per disc, shrinks to pocket change — the same re-framing that made diamond hand pads a retail staple. Retail buyers of this product also read instructions, so the sleeve insert carries more selling weight here than in any professional channel.
13. Frequently asked questions
What is an electroplated diamond flap disc?
It looks like an ordinary flap disc, but the overlapping flaps are sheets of electroplated diamond instead of zirconia cloth: synthetic diamond grains are nickel-plated onto a flexible honeycomb-pattern backing, and the sheets are stacked into flaps around a fiberglass or plastic backing plate. The diamond does the cutting; the flap construction does the conforming – it follows rounded edges and bullnose profiles that a rigid diamond cup wheel would catch, grab or chip. It is a finishing tool for porcelain, quartz, granite and marble, not a general metalwork disc.
Which grit should I choose – #60, #120, #200 or #400?
Buy the chain, use it in order. #60 removes the most material – flattening a saw-cut step of roughly 0.5-1 mm on a slab edge or cutting a chamfer. #120 evens out the #60 scratches into a uniform matte finish. #200 takes the edge toward a soft sheen, and #400 leaves a near-polish that many matte and honed materials accept as finished. Each grit should erase the scratch pattern of the one before it; skipping a stage doubles your time and risks burning the glaze on porcelain. The full chain table with per-grit duty is in section 3.
Will it chip the glaze on porcelain?
Not if the technique is right, and the flap construction is the reason. A rigid cup wheel hits glazed porcelain with a hard, flat contact line and digs in at corners – the classic chipping failure. The diamond flap disc presents a compliant, edge-on contact at a shallow 10-15 degree angle, so pressure spikes spread across flexible flaps instead of concentrating. Start on the face side of the edge, never dig into a corner, support the tile so it cannot vibrate, and let the flaps feed. Corner chipping almost always means too much angle or too much pressure, not the wrong disc.
How long does one disc last?
Modelled service bands for the standard diameter: 25-40 slab edges of roughly 2 m each through the #60 stage, and proportionally more for the finer grit stages, which remove less and wear slower. Total chain life on porcelain typically runs 20-40 times a zirconia flap disc doing the same work, because diamond does not dull against ceramic the way zirconia does – it micro-fractures to fresh edges. These are planning bands, not a warranty; confirm on your own material with the check in section 10.
Can I use it on metal or concrete?
No, and both fail for different reasons. On steel, diamond abrasives load up with metal swarf in minutes and then glaze – a zirconia flap disc is the correct tool for metal. On concrete and heavy masonry stock removal, a rigid diamond cup wheel carries far more diamond and removes material far more economically; the flap disc is a finishing tool. Between those limits – porcelain, ceramic, quartz, granite, marble and other brittle hard materials – it is exactly the right construction.
What speed should I run it at?
Lower than a resin fibre disc. Recommended working range is roughly 6,000-10,000 RPM on a 115 mm grinder – a variable-speed grinder at mid setting – with the maximum rated speed printed on the backing plate never exceeded. High speed on glazed porcelain burns the binder and glazes the nickel bond before the diamond is half worn. If the surface turns shiny-smooth and stops cutting, the disc has glazed: drop speed, dress lightly on a coarse abrasive stone, and reduce pressure.
Bore disc or M14 threaded hub – which form do I need?
The bored disc mounts under the standard angle-grinder flange like any flap disc or cutting disc, and is the form most general tile fitters want. The M14 threaded hub version screws directly onto the grinder spindle, so disc changes take seconds without a spanner – the form stone shops and production counters prefer when they are running a whole grit chain in a session. Both forms are shown on the product poster; confirm current production availability of each with us before ordering.
How is this different from your Mini Diamond Flap Disc?
Same electroplated diamond flap construction in a smaller diameter, built for mini angle grinders and detail work – inside cuts, small mitre edges, tight radii – where a full-size disc is too stiff and too heavy on the wrist. This page covers the standard diameter for slab and tile edges on a normal angle grinder. Most distributors stock both: the standard disc does the metre-age, the mini does the corners and corrections.
What is the MOQ, lead time and sample policy?
The standard MOQ for diamond tools is 500 pieces per configuration, and a mixed-grit carton within the MOQ is possible. Lead time is 7-15 days for stocked grit and 20-35 days for OEM programmes after advance payment. Samples are available at cost price plus freight and the sample charge is credited against the first order. Payment terms are T/T, L/C and PayPal; loading ports are Shanghai and Ningbo.
Are GUSHI diamond flap discs certified?
The manufacturing site operates under an ISO 9001:2015 quality management system, and every batch is inspected before shipment for plating coverage, flap riveting, backing-plate integrity and marking. SGS inspection is available on request. For the abrasive safety side, the backing plate carries a maximum rated speed; confirm the printed rating matches your market requirements before sale. CE and EN13236 references in our catalogue are quality-system claims and should be confirmed against scope before being published as product certifications.
OEM & wholesale
Huzhou Gu’s Imp. & Exp. Co., Ltd. has exported tools from Huzhou, Zhejiang since 2004 and supplies the Diamond Flap Disc range to importers, distributors and private-label programmes in more than 20 countries. The product sells as a chain, so the first OEM decision is not artwork — it is the grit ladder you stock and whether your market runs bore form, hub form or both.
| Parameter | Standard | To order |
|---|---|---|
| Grit ladder | #60 / #120 / #200 / #400 | Single grit, or extended ladders with #80 / #150 |
| Form | Bore and M14 hub | Other hub threads to confirm against market spindles |
| Diameter | Standard grinder size, per catalogue | Confirm with factory; mini diameter separate listing |
| Marking | Printed plate with brand, grit and max speed | Private-label plate artwork and sleeves |
| Packing | Sleeve + master carton | Display box, chain-sets (4 grit) packaged together |
| Quality | 100% batch inspection under ISO 9001:2015 | SGS inspection; batch plating reports |
| Samples | Cost price + freight, credited to first order | Four-grit sample chains for counter trials |
| Terms | T/T, L/C, PayPal | Ports: Shanghai and Ningbo |
| Lead time | 7–15 days stocked grit | 20–35 days OEM after advance payment |
Two programme notes from the field. First, sell the chain as a set in your packaging wherever possible — four-grit boxes reorder faster and stop the single-grit disappointment returns described in section 2. Second, print the working angle and the speed band on the sleeve, not just the grit number: most “disc not sharp” complaints trace to running #60 at full grinder speed, and a sleeve that prevents that call pays for its ink on the first carton.